Using 3D printing to make molds for metal casting is a modern and efficient approach that combines the flexibility of additive manufacturing with the strength and durability of metal casting.
This process is particularly useful for prototyping, custom parts, or low-volume production. Below is a step-by-step guide on how to use 3D printing to make molds for metal casting.
Using 3D printing to make molds for metal casting is a digital process that creates investment molds or sand molds directly through additive manufacturing. This replaces traditional manual mold-making methods.
This article introduces the main technology types for 3D printed casting molds, analyzes their advantages over traditional methods, explains material selection and design keys, details the operation process.
- Main Technology Types for 3D Printed Casting Molds
- Choose the Right 3D Printing Technology
- Core Advantages of 3D Printed Casting Molds
- 3D Print the Pattern or Mold
- Design and Operate process for 3D Printed Casting Molds
- Precautions of using 3D printing to make moulds for metal casting
Steps to use 3D printing to make moulds for metal casting
Main Technology Types for 3D Printed Casting Molds
Different 3D printing technologies suit different types of casting mold manufacturing. Choose the right process based on your application.
Fused Deposition Modeling
- FDM builds parts layer by layer using thermoplastic filament, offering low cost and simple operation
- Prints materials like PLA and ABS for investment patterns
- Suitable for small-batch investment casting, either printing wax patterns directly or creating master patterns
Stereolithography Technology
- SLA and DLP use UV light to cure liquid resin, achieving accuracy up to 0.05mm
- Prints wax-like resin with excellent surface quality, ideal for jewelry and precision castings
- Resin patterns leave minimal ash during burnout, suitable for lost-wax casting
Powder Bed Fusion Technology
- SLS and MJF use nylon powder sintered into solid parts
- PA12 with 40% glass fiber filling achieves tensile strength up to 30MPa
- Suitable for producing master patterns for sand casting
Choose the Right 3D Printing Technology
Fused Deposition Modeling (FDM)
Uses thermoplastic filaments like PLA or ABS. Suitable for simple patterns or low-temperature casting.
Stereolithography (SLA)
Uses resin to create high-detail patterns. Ideal for intricate designs.
Selective Laser Sintering (SLS)
Uses nylon or other powders to create durable patterns.
Binder Jetting
Can print sand molds directly for sand casting.
Best for Metal Casting
SLA or SLS for detailed patterns, or binder jetting for direct sand mold printing.
Core Advantages of 3D Printed Casting Molds
Compared to traditional CNC machining and manual mold-making, 3D printing shows significant advantages in several areas.
Shorter Lead Times
- Traditional wooden patterns take weeks to months, relying on skilled model makers
- 3D printing reduces pattern delivery time by up to 50%, requiring no manual supervision
- MJF printed a 457mm diameter turbine inlet cone in just 16 hours
Breakthrough Design Freedom
- Traditional machining cannot manfucture conformal cooling channels or complex internal structures
- 3D printing allows free design of cooling channels that follow cavity surfaces closely
- Creates thin walls, complex undercuts, and lattice structures impossible with conventional methods
Improved Thermal Management
- Conformal cooling eliminates hot spots, reducing mold temperature difference from ±15°C to ±5°C
- Uniform cooling reduces thermal stress, lowering warpage and hot break risks
- Die casting mold thermal fatigue life extends, reducing crack failures
Lower Costs and Material Waste
- Small-batch production avoids expensive hard tooling, controlling per-part costs
- Additive manufacturing achieves high material utilization, with powder recyclable
- Eliminates multiple machining steps, reducing tooling and fixture investment
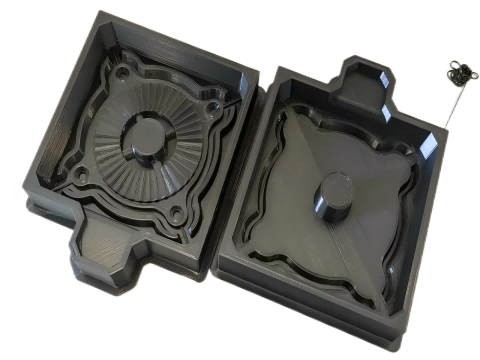
3D Print the Pattern or Mold
For Lost-Wax Casting (Investment Casting)
Print the pattern using wax-like resin (SLA) or a burnable material. And the printed pattern will be used to create a ceramic shell mold.
For Sand Casting
Print the pattern directly using a durable material (e.g., PLA or resin). Alternatively, use binder jetting to print the sand mold directly.
For Direct Mold Printing
Print the mold cavity directly using a high-temperature-resistant material (e.g., ceramic or sand)
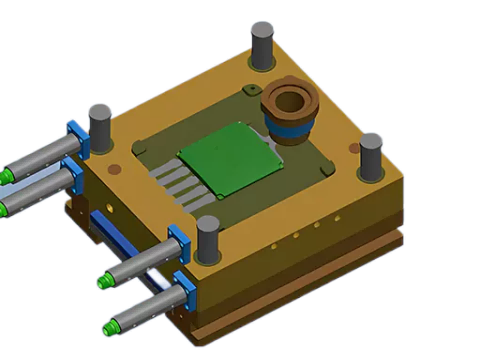
Design and Operate process for 3D Printed Casting Molds
Mastering the correct process is key to successful 3D printed mold applications. Several steps lead from digital model to final casting.
3D Modeling and Shrinkage Compensation
- Design part models in CAD software, considering machining allowances
- Add casting shrinkage allowance, aluminum typically enlarge 3%, actual shrinkage about 1%
- Design gating systems, risers, and vents, integrated into the mold
Split Model and Optimize Structural
- Models exceeding print size need split into multiple parts with dovetail connections
- Hollow shell design with 2-3mm wall thickness, ribs added for stiffness
- reserve alignment pin holes and threaded holes for assembly accuracy
3D Printing and Post-Processing
- Export STL files, set print parameters (layer height 0.1mm, infill 50%)
- Remove supports after printing, sand or chemically polish surfaces
- Infiltration treatment seals porosity, improving surface finish
Molding and Pouring
- Polymer master patterns adapt to producing sand molds or ceramic shells
- Directly printed sand molds assembled and ready for metal pouring
- Metal inserts mounted in die casting mold bases, connected to cooling systems
Post-Processing and Mold Reuse
- Cut gates from castings, clean surfaces
- Sand molds are single-use, metal inserts produce tens of thousands of parts
- Archive files for future copy or modifications
Precautions of using 3D printing to make moulds for metal casting
Material selection
Choosing the right 3D printing material is critical, especially for high temperature casting applications.
Post-processing
Ensure the surface quality of the mold and casting to improve the accuracy and durability of the final product.
Technical constraints
While 3D printing technology has great potential in the casting field, there are still some technical challenges that need to be addressed, such as the mechanical properties and thermal stability of the material.
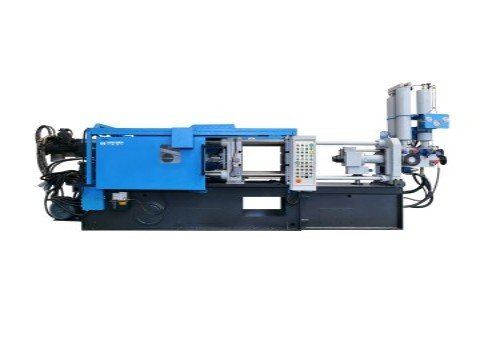
Haichen die casting mould design
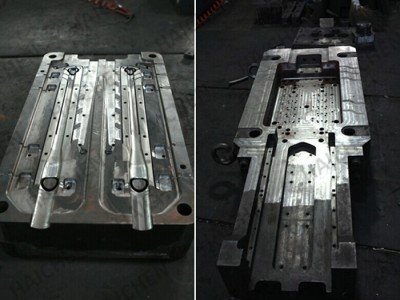
Haichen is a well-known manufacturer of die-casting machines, and designing a die-casting mold (also called a die or tool) for use with Haichen machines requires careful planning and expertise. We mainly supply cold chambe die casting machine, hot chamber die casting machines, die casting mold and aulixiary equipments. Die-casting molds are used to produce metal parts with high precision and repeatability, typically using materials like aluminum, zinc, or magnesium.
We can design a high-quality die-casting mold according to the customers’ needs.


